Showing Posts From
Tutorial
- 07 Aug, 2026
How to Generate Certificates From a Spreadsheet (CSV to ZIP, No Mail Merge)
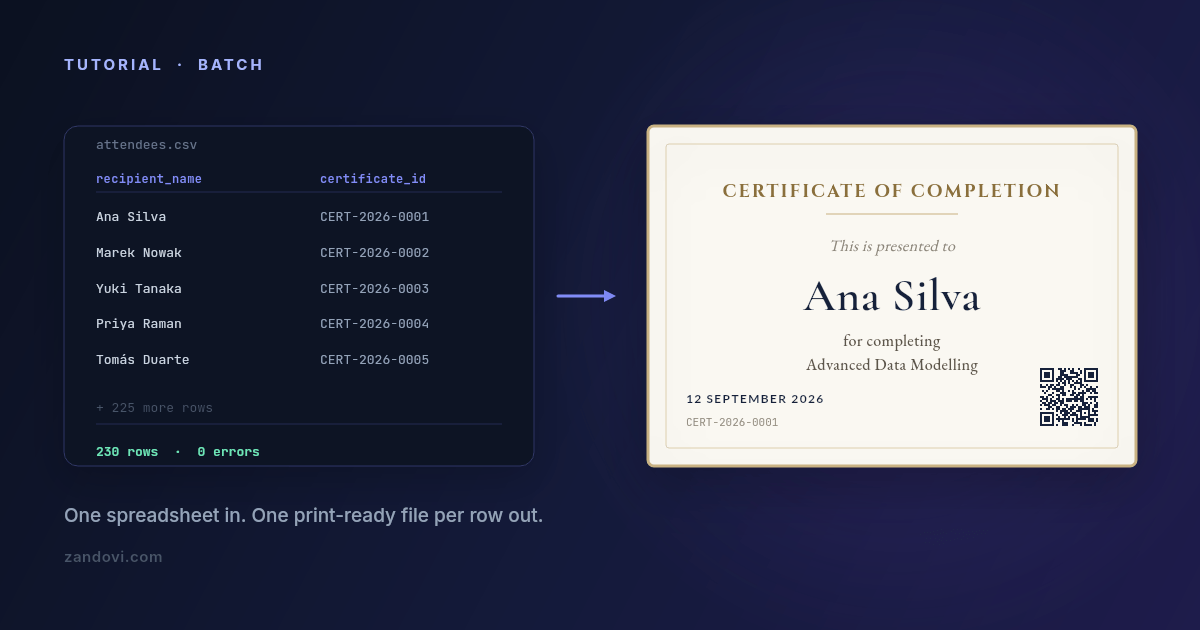
The course finished on Friday. Two hundred and thirty people attended. Each of them needs a certificate with their own name spelled correctly, the course title, the completion date, and something that makes it look like it came from an organization rather than from a word processor at 11pm. You have all of that in a spreadsheet already. The gap is turning 230 rows into 230 files. Why the usual routes hurt Mail merge. Word and Google Docs will merge names into a document, and for plain text on white paper that's fine. Certificates aren't plain text. They're a layout, with a border, a logo, a signature block, and typography that has to sit exactly where you put it. Merging into a designed document tends to nudge things by a few pixels per record, and you find out at print time. Duplicating slides. The 230-slides-in-a-deck approach. It works, and it costs an entire afternoon, and any change to the design means doing it again. Design-tool bulk features. Better, and genuinely the right tool for some jobs. The limits show up as row caps, no automation hook, and export formats that aren't print-ready. A script. If you're comfortable with code, generating certificates from a CSV in Python is a solid afternoon's work. Then you own the layout code, the font loading, and the PDF generation forever. What follows is the fourth route: design the certificate once in an editor, mark the parts that change, upload the spreadsheet, download a ZIP. Step 1: design the certificate Start from a certificate template or a blank canvas. If these will be printed, set the canvas up for print from the start: pick an A-series or US Letter preset in landscape, and set the export DPI to 300. Doing this first matters. A canvas sized for the screen and scaled up afterwards is how you end up with a soft logo on a printed certificate.Lay out the fixed parts: border, organization logo, the words "Certificate of Completion", the signature line. These never change, so they're just design. Step 2: mark what changes as variables This is the step that turns a design into a generator. Select each element that differs per person, mark it as a variable, and give it a name:Variable Element Notesrecipient_name text Set auto-fit so "Bartholomew Featherstonehaugh" and "Li Wei" both look intentional.course_title text Usually identical across the batch. Give it a default value and you can leave the column out.completion_date text Dates travel through as text, so format them in the spreadsheet exactly as they should print.certificate_id text Mark it required so a blank cell is caught rather than rendering an empty line.verify_qr QR code Encodes a verification URL. See below.Give every variable a description too. It shows up as guidance later, and if someone else ever fills the spreadsheet, that one sentence prevents most of the back-and-forth. Where a column should only ever hold a handful of known values, set its Allowed values list. Type in the real values and anything else in that column is rejected before rendering, which is the cheapest way to stop a typo becoming 230 wrong certificates. A note on the QR code. Binding a QR element to a variable lets each certificate carry its own verification link, https://yoursite.com/verify/{certificate_id}, which is how you make a certificate checkable rather than merely decorative. Keep the QR element at least 100×100 px and use the Print Safe button to get the quiet zone right; QR codes printed too small or too close to a border are the number one reason scans fail on paper.Step 3: get the CSV with the right headers Click Generate, then the Batch tab, then Download CSV Template. This gives you a CSV whose header row already matches your variable names exactly. Use it. The most common failure in bulk generation is a column called Name when the template expects recipient_name, and starting from the generated file removes that entire category of problem. Open it in Excel, Google Sheets or Numbers, and paste your data underneath. One row per certificate: recipient_name,course_title,completion_date,certificate_id,verify_qr Ana Silva,Advanced Data Modelling,12 Sep 2026,CERT-2026-0001,https://example.com/verify/CERT-2026-0001 Marek Nowak,Advanced Data Modelling,12 Sep 2026,CERT-2026-0002,https://example.com/verify/CERT-2026-0002 Yuki Tanaka,Advanced Data Modelling,12 Sep 2026,CERT-2026-0003,https://example.com/verify/CERT-2026-0003If you're building the ID and verification URL from a spreadsheet formula, double-check the first and last rows after filling down. Off-by-one errors in a fill-down are invisible until someone scans a code and lands on the wrong person's record. Step 4: upload and let validation do its job Drag the completed CSV into the upload area. Three things happen before anything renders. Your column headers are matched against the variable names, so a missing required column is flagged immediately and any column the template doesn't recognise is called out as ignored. Then every row is checked: a missing required value, a value outside a variable's allowed list, or QR data too long to encode all get reported with the row and column named. Finally, any column whose values run much longer than the default you designed around is flagged as a fit risk, so you find out that one name is three times the length of the rest before it shrinks to unreadable. You get a summary like "3 errors in 230 rows" with a table naming each one. Fix them in the spreadsheet, re-upload, re-validate. This step is the whole reason to prefer a validated batch over a script you wrote on Thursday. Catching three bad rows before rendering costs you two minutes. Catching them after you've printed and mailed 230 certificates costs considerably more.Step 5: choose your output, then submit Pick the format and resolution. Use PDF at 300 DPI for anything going to a printer or a print shop, and PNG at 2× scale for anything going into an email or a download link. Then Submit Batch. The job appears in the list below with a status of PENDING, PROCESSING, COMPLETED or FAILED, along with the row count and how long ago you submitted it. When it's done, Download Results gives you a ZIP with one file per row. If a job comes back FAILED, expanding it in the list tells you which rows failed and why. Renders that fail are refunded to your quota, and a batch rejected at validation is never charged at all, so a failed job doesn't cost you anything except the time to fix and resubmit. The row limits, stated plainly Batch jobs have a per-job row cap that depends on your plan:Plan Rows per jobFree 25Personal 100Studio 200Team 300Business 400So a 230-person course is one job on Team, two on Studio, three on Personal. The practical workaround for a larger cohort is to split the spreadsheet by cohort, session or date, which is usually how you want the files organized anyway. Sort the sheet first, then split; that way each ZIP maps to something meaningful rather than to an arbitrary row range. Every rendered row counts as one render against your monthly pool, the same as an API call. 230 certificates is 230 renders. On the $29 Personal plan that's 5,000 renders a month, so the certificates for a busy training calendar fit comfortably; on the free plan's 100 renders, a single mid-sized cohort will use most of it. There's also a maximum output resolution that varies by plan. The free plan tops out around A5 at 300 DPI, paid plans go to A4/US Letter and above. If you're producing large-format certificates, check that before designing the canvas rather than after. Making the files easy to hand out Two things worth deciding before you generate rather than after. The first is file naming. Files in the ZIP are named from your data, so having a certificate_id column pays for itself here. A ZIP of CERT-2026-0001.pdf files is trivially matchable against your attendee list. A ZIP of certificate-1.pdf files is not. The second is delivery. If you're emailing these individually, keep the same CSV as the source of truth: it already has the name, the ID, and, if you add a column, the email address. The ZIP and the sheet then line up row for row, and whatever you use to send the mail can join them without a manual matching step. When to move from the spreadsheet to the API The batch flow is a browser workflow: a person uploads a file and downloads a ZIP. That's the right shape when certificates are an event. A cohort finishes, you generate a set. It's the wrong shape when certificates are a continuous stream. If your platform issues one the moment a learner finishes a course, at unpredictable times, you want the same template called from your backend instead: one POST per completion, PDF bytes back, attached to an email or stored against the learner record. Same template, same variables, no spreadsheet. Most teams end up using both. The API covers the automated path, and the batch tab covers the "we ran a workshop and need 40 certificates by Thursday" path that never quite fits the automated one.The batch generation guide covers the dialog in detail, and the free plan gives you 100 renders a month so you can try a real cohort without a card.
- 04 Aug, 2026
Dynamic OG Images With an API, Without Running a Headless Browser
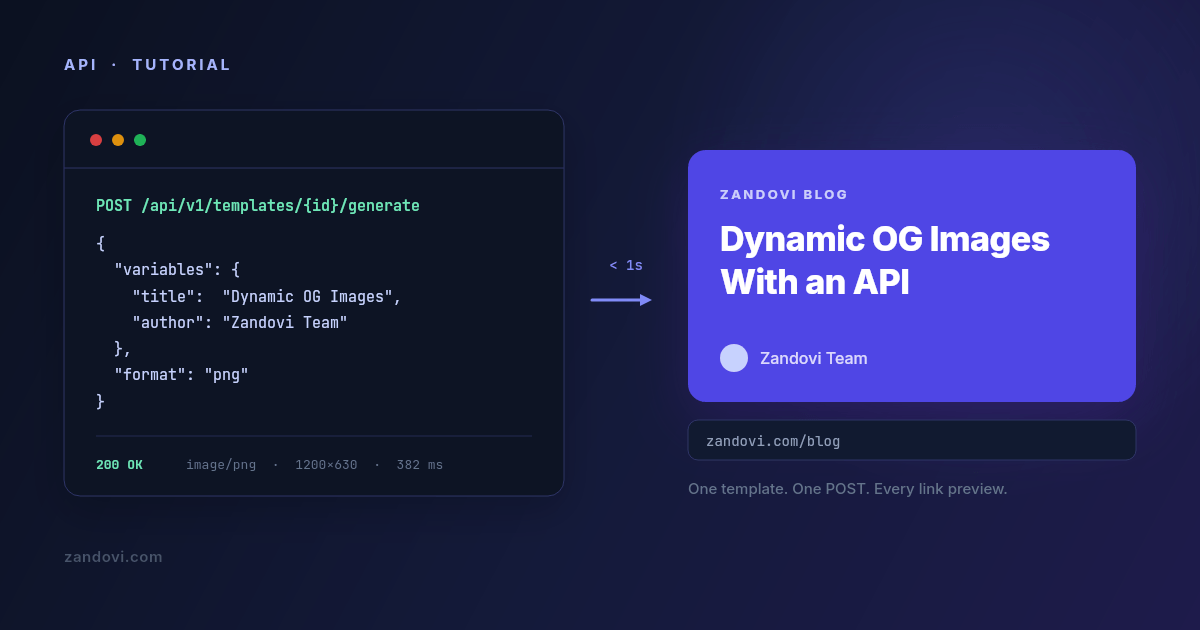
Every content site eventually needs the same thing: a link preview image per page, with the page's own title on it. Share a post on X, LinkedIn or Slack and the card that appears is doing real work. It's the difference between a link that gets clicked and a link that scrolls past. Making one by hand is fine. Making four hundred is not. So the question becomes how you generate them, and the answer you find online is usually one of three, each with a cost that isn't obvious until you're maintaining it. The three usual approaches Hand-made in a design tool. Highest quality, zero automation. Works until you publish weekly, at which point it becomes a recurring chore nobody wants and eventually gets skipped. A headless browser. Write the card as HTML and CSS, load it in Puppeteer or Playwright, screenshot the viewport. This works. It's how a lot of production systems do it, and it's genuinely the right answer if you already run a browser farm for other reasons. What you're signing up for is a Chromium binary in your deploy artifact, cold starts measured in seconds, memory limits that bite at the worst time, and a font-loading bug on the day you switch base images. The rendering isn't the hard part. Operating the thing that renders is. A JSX-to-SVG renderer like Satori (what @vercel/og uses under the hood). Much lighter than a browser and a genuinely good fit for simple cards. The trade-off is that you're writing your design in a constrained subset of CSS, in code, and every visual change is a code change and a deploy. If a non-engineer ever wants to adjust the layout, they can't. There's a fourth option that gets less attention: treat the card as a designed template with named variables, and render it over HTTP. The design lives in a visual editor, the code sends values. That's the approach this post walks through, using Zandovi's API. What the flow looks likeDesign the card once in the editor, marking the parts that change (title, author, category) as variables. Send a POST with those values. Get PNG bytes back.You don't run a browser, there's no build step, and changing the design doesn't need a redeploy. Here's the whole request: curl -X POST https://app.zandovi.com/api/v1/templates/$TEMPLATE_ID/generate \ -H "X-Api-Key: $ZANDOVI_API_KEY" \ -H "Content-Type: application/json" \ -o og.png \ -d '{ "variables": { "title": "Dynamic OG Images With an API", "author": "Zandovi Team", "category": "Engineering" }, "format": "png" }'That's it. The response body is the image itself: raw bytes, Content-Type: image/png, no JSON wrapper to unpack and no hosted URL to fetch in a second round trip. Step 1: design the card Create a canvas at 1200×630, the size every platform expects for a link preview. Lay out the background, any logo or gradient, and the text blocks. Then mark the text that changes as a variable. A variable has a name (the key you'll send in JSON), a required flag, and optionally a default value and a list of allowed values. For an OG card you'll typically want:Variable Element Notestitle text The one that matters. Turn on auto-fit so long titles shrink instead of overflowing.author text Give it a sensible default so a missing value doesn't render an empty box.category text Optional. Set its Allowed values to restrict it to your real categories.The auto-fit setting deserves a moment. Blog titles vary wildly in length, and the single most common failure mode for generated cards is a long title running off the canvas or being silently clipped. Auto-fit takes a minimum and maximum font size and picks the largest that fits the box, so a six-word title renders big and a twenty-word title renders smaller but complete. Step 2: get an API key In the app, open Settings → API Keys, name a key (og-images is a fine name) and create it. The key is shown exactly once, so copy it straight into your secret store. Keys are scoped to a workspace and inherit that workspace's quota. export ZANDOVI_API_KEY="your_api_key"Never put this in client-side code. Anyone holding the key can spend your renders. Step 3: ask the template what it accepts Before wiring anything up, have the template tell you its own schema. This avoids the classic bug where your code sends postTitle and the template expects title, and you find out from a support ticket three weeks later: curl https://app.zandovi.com/api/v1/templates/$TEMPLATE_ID \ -H "X-Api-Key: $ZANDOVI_API_KEY"The response includes a variables array with each variable's name, type, whether it's required, and its validation rules. Read endpoints like this one don't consume render quota, so you can call it freely, including from a test that asserts your code and your template still agree. That last point is worth doing. A one-line test that fetches the schema and compares the variable names against the object your code builds will catch a designer renaming a field long before it reaches production. Step 4: render from your app Here's a small helper in TypeScript: type OgFields = { title: string; author: string; category?: string; };export async function renderOgImage(fields: OgFields): Promise<Buffer> { const res = await fetch( `https://app.zandovi.com/api/v1/templates/${process.env.OG_TEMPLATE_ID}/generate`, { method: "POST", headers: { "X-Api-Key": process.env.ZANDOVI_API_KEY!, "Content-Type": "application/json", }, body: JSON.stringify({ variables: fields, format: "png", }), }, ); if (!res.ok) { // Errors are RFC 9457 problem+json const problem = await res.json(); throw new Error( `OG render failed (${problem.status} ${problem.code}): ${problem.detail} ` + `[requestId=${problem.requestId}]`, ); } return Buffer.from(await res.arrayBuffer()); }Two details in there are load-bearing. The first is that there's no server-side deduplication, so calling twice costs twice. The API has no idempotency key. Every POST to the generate endpoint is a fresh render against your quota, even if the variables are byte-identical to the last one. That makes "don't call it twice" your job, not the server's. Derive a stable key from the content, like the post slug or a hash of the fields, check your own cache or storage first, and only call the API on a miss. A retried build or a double-fired webhook is otherwise a second render. The second is requestId. Every error body carries one, and every successful response carries an X-Request-Id header. Put it in your logs. It's the single piece of information that turns "images sometimes fail" into a traceable incident. Where to call this from The tempting design is a route handler that renders on demand: /og/[slug].png calls the API and streams the result. Don't do that without a cache in front of it. Crawlers, preview bots and link unfurlers hit OG images repeatedly and unpredictably, and each uncached hit is a render off your quota. Two patterns that hold up: Render at publish time. When a post is created or updated, render the card once, upload the bytes to your object storage or CDN, and store the resulting URL on the post record. generateMetadata then just returns a string. One render per post per edit, and serving costs you nothing: export async function generateMetadata({ params }): Promise<Metadata> { const post = await getPost(params.slug); return { title: post.title, openGraph: { images: [{ url: post.ogImageUrl, width: 1200, height: 630 }], }, }; }Render on demand, then cache hard. If you'd rather not add a publish hook, keep the route handler but put your CDN in front of it with a long Cache-Control, and write the rendered bytes to storage on the first miss so the second miss never reaches the API. Because nothing deduplicates on the server side, every cache miss is a paid render. That's exactly why the publish-time pattern above is the safer default.Handling the errors that actually happen Three you should code for. A 400 with code: VALIDATION_ERROR means a required variable is missing or a value failed the template's validation. The details object maps each offending variable name to what was wrong with it. That's a bug in your code rather than a transient failure, so don't retry it. A 429 with code: RATE_LIMIT_EXCEEDED is short-term throttling. Back off and retry, honoring Retry-After. A 429 with code: QUOTA_EXCEEDED means you're out of renders for the month, and retrying won't help until the reset. Branch on the code field rather than the status alone, or your backoff loop will spin pointlessly for two weeks. Every successful render also returns X-Quota-Remaining and X-Quota-Reset. Emitting X-Quota-Remaining as a gauge metric costs you nothing and means you find out you're running low from a dashboard rather than from broken link previews. Failed renders are refunded automatically, so a 502 from the rendering service doesn't quietly cost you anything. What it costs For OG images specifically, the volume is low: one render per post, plus one per edit. A site publishing weekly generates maybe a hundred renders a year. That sits inside the free tier (100 renders a month, no card) with room to spare. The volume argument only shows up when OG images are one job among several. If the same account is also generating certificates, email graphics or social variants, you're looking at the paid tiers: $29/month for 5,000 renders, and manual exports from the editor don't count against that on any paid plan. When this is the wrong tool Be honest about the fit. If the card has to reflect live data at request time, like a leaderboard position or a current price, this isn't it. Caching is what makes the approach cheap, and live data is what breaks caching. A JSX renderer running in your own edge function fits better. If your card is genuinely simple, a title on a solid background and nothing else, @vercel/og will do it in about thirty lines and one dependency. Reach for a template service when the design has enough going on that you want it maintained in an editor rather than in JSX. And if you already operate a browser farm, adding an external dependency to save a screenshot call isn't obviously a win. Where this approach earns its keep is the case in between: a card that's designed rather than laid out in code, that someone non-technical might want to restyle next quarter, and that you'd rather not redeploy to change.Want to try it? The API quickstart goes from key to first rendered PNG in a few minutes, and the free plan includes 100 renders a month with no card required.
- 12 Jul, 2026
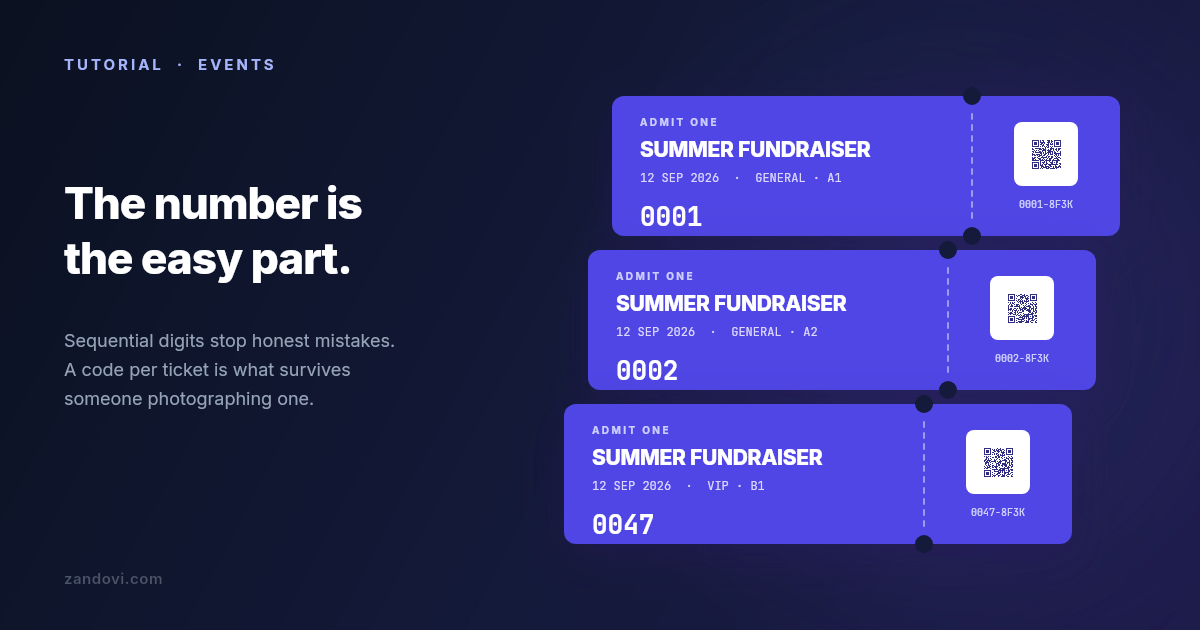
How to Number Event Tickets (And Why the Number Isn't Enough)
Two hundred tickets for a fundraiser. You design one, it looks good, and then you hit the part nobody writes about: making all two hundred different from each other. The naive version is a sequential number in the corner. That's worth doing, but be clear about what it buys you. A printed number stops you double-selling seat 47 and gives you something to write on a refund note. It does not stop anyone photographing a ticket and showing the photo at the door, because the number on the photo is just as valid as the number on the paper. So this covers both halves: producing the run with real per-ticket data, and making the ticket checkable rather than merely numbered. What a ticket has to do Three jobs, and they pull in different directions. It has to look like your event, which is a design problem. It has to be readable in about two seconds by someone standing in a doorway in bad light, which is a typography problem. And each one has to be distinguishable from every other one, which is a data problem. Most ticket tutorials only solve the first. The door test is the one people underestimate. Whoever is checking tickets is looking for the date, the tier, and whether it's real. Put those three where the eye lands first and let the artwork be artwork. A beautiful ticket that makes someone squint at 7pm is a worse ticket. Start from a template if one fits You don't have to design from nothing. There are 13 ticket designs in the template gallery, covering concerts, festivals, theatre, raffles, parking, sports, conferences and a few others. Open the gallery, choose the Tickets tab, and open whichever sits closest to your event. You can change every colour, font and element afterwards, so pick on layout rather than on palette. Be clear about what that actually saves you. A template gives you the composition and the artwork, which is the slow part. It does not arrive pre-wired with variables, and it's built on a 1200×600 px canvas rather than a physical paper size. So everything below still applies: you set the units and DPI yourself, and you mark your own variables in Step 2. What you skip is the blank page and the hour of nudging things into alignment. Step 1: set the canvas up for print before you design Open the New Canvas dialog and pick from the Tickets preset category, or set your own dimensions. If you're sizing manually, switch the units from pixels to millimetres or inches first. Designing in physical units and letting the app compute the pixels is much less error-prone than picking a pixel size and hoping it lands on a sane paper size. Set the export DPI to 300 now rather than later. The DPI options are fixed at 96, 150 and 300, so this isn't a free-form field you can fine-tune afterwards, and a canvas laid out for screen then pushed to print is how you get a soft logo on 200 pieces of card.One thing to know up front: there's no bleed or crop-mark support. If your design runs colour to the edge and you're using a commercial printer, ask them what bleed they want, then add it yourself by making the canvas that much larger and keeping the trim area clear of anything important. For home printing on perforated stock this doesn't come up. Step 2: decide what changes per ticket Everything that differs between ticket 1 and ticket 200 becomes a variable. Select the element, mark it as a variable, then give it a name:Variable Element Notesticket_number text Pad to a fixed width in the sheet so leading zeros survive. 0047 sorts and reads better than 47.tier text Set its Allowed values to your real tiers, so a typo in the sheet is caught before printing.holder_name text Only if tickets are named. Turn on auto-fit so long names don't overflow.seat text Optional, with the same allowed-values trick as tier if seats come from a fixed set.verify_qr QR code The half that actually matters. See below.Add a description to each one. If someone else fills the spreadsheet later, that single sentence prevents most of the questions. The fixed parts, meaning the event name, date, venue and artwork, stay as ordinary design. They're the same on every ticket, so they never touch your data. Step 3: build the numbers in your spreadsheet Here's the honest bit: there is no auto-increment feature. Zandovi doesn't generate a sequence for you. The numbers come from the CSV you upload, which means your spreadsheet is what produces them. That's less of a limitation than it sounds, because a spreadsheet is genuinely good at this and it leaves the sequence under your control. Download the CSV template from the Batch tab so your headers already match the variable names, then fill down: ticket_number,tier,seat,verify_qr 0001,General,A1,https://example.com/t/0001-8F3K 0002,General,A2,https://example.com/t/0002-QW7P 0003,VIP,B1,https://example.com/t/0003-M2XRTwo habits worth adopting. Pad the numbers to a fixed width (0001, not 1) so they sort correctly and look deliberate. And don't make the verification URL guessable: append a short random suffix to the sequential part, as above. A purely sequential URL means anyone holding ticket 0003 can guess 0004 through 0200. When you're done filling down, check the first and last rows. Off-by-one errors in a fill-down are invisible until someone at the door scans a code that belongs to a different person. Step 4: the QR code is the part that does the work Bind a QR element to the verify_qr variable and every ticket carries its own link. This is the difference between a ticket that looks unique and one that is unique, because the code encodes something your system can check when it's scanned. Three constraints matter once it's on paper. The QR element has a 75×75 px minimum, and 100×100 is the sensible floor, because smaller codes fail to scan at exactly the moment you can't afford it. Use the Print Safe button to get the quiet zone right, since the four-module margin around the code is what lets a scanner find it at all. And test the real printed output before committing to the run: print one, then scan it with the oldest phone you can find, in bad light. If your door hardware is a laser scanner rather than a phone, use a barcode element instead. CODE128 handles alphanumeric ticket IDs, with EAN13, UPC, CODE39 and ITF14 also available. Barcodes have their own minimums of 100 px wide and 40 px tall. One caveat worth stating plainly: generating the code is not the same as validating it. Zandovi produces a ticket carrying a unique URL. Whether that URL has already been used at the door is a question for whatever sits behind it, whether that's your event platform, a spreadsheet someone ticks off, or a small app you write. If nothing checks the code, the QR is decoration. Step 5: let validation catch the bad rows Upload the CSV in the Batch tab. Before anything renders, your headers are matched against the variable names and every row is checked against the template's rules. Missing required values get flagged, as does a tier outside your allowed values, or QR data too long to encode. This step matters more for tickets than for almost anything else, because the failure is expensive and late. A bad row in a set of certificates costs you a reprint. A bad row in a set of tickets costs you an argument at the door with someone holding a ticket that doesn't scan.Fix the flagged rows in the sheet, re-upload, re-validate, then submit. Step 6: generate and print Choose PDF at 300 DPI for anything going to a printer. The job appears in the list with a status of PENDING, PROCESSING, COMPLETED or FAILED, and when it's done, Download Results gives you a ZIP with one file per row. Row caps per job depend on your plan: 25 on Free, 100 on Personal, 200 on Studio, 300 on Team, 400 on Business. So a 200-ticket run is one job on Studio and two on Personal. Split by tier or by date rather than by arbitrary row ranges, and each ZIP maps to something you can actually hand to someone. Every rendered row counts as one render against your monthly pool, so 200 tickets is 200 renders. Renders that fail are refunded automatically, and a batch rejected at validation is never charged, so a failed job costs you time and not quota. There's also a maximum output resolution that varies by plan, so if you're producing large-format passes rather than pocket tickets, check that before you design rather than after. Making the ZIP usable on the day Files in the ZIP are named from your data, which is the reason to have a ticket_number column even if the number never appears prominently on the design. A ZIP of 0001.pdf through 0200.pdf can be matched against your guest list. A ZIP of anonymously named exports cannot. Keep the same CSV as your source of truth. It already has the number, the tier and the verification URL, so if you add an email column it becomes both your send list and your door list, and the files line up with it row for row. When to skip the spreadsheet entirely The batch flow is a human workflow. You sit down, you make 200 tickets, you're done. That fits an event, because events have a date and tickets get made before it. It doesn't fit selling tickets continuously. If a ticket should exist the moment someone pays, at whatever hour that happens, you want the same template called from your backend instead: one POST per purchase carrying that buyer's number and URL, PDF bytes back, attached to the confirmation email. Same template, same variables, nobody at a keyboard. Most event organizers end up using both, because the pre-sale run and the walk-up ticket are genuinely different problems. What this costs A 200-ticket event is 200 renders. The free plan's 100 renders a month covers a small event or a test run of one tier. Beyond that you're on Personal at $29/month for 5,000 renders, which covers a season of events rather than a single one, and manual exports from the editor don't count against it.The batch generation guide covers the dialog step by step, and the template gallery has 13 ticket designs to start from rather than a blank canvas.