Event Ticket Template That Prints Right Every Time
- 30 Aug, 2026

The wrong event ticket template usually fails in the same way every time. It looks fine on the screen, then someone prints it on cheap stock, scans it under bad lighting, and the whole check-in line slows down because the code is too small, the fields are in the wrong place, or the CSV column names don’t match the template anymore.
A better workflow treats the ticket like a database row first and a print job second. The spreadsheet carries the truth, the template is just the layout, and the QR code is only useful if the variable behind it stays consistent from upload to scan.
Table of Contents
- Choosing an Event Ticket Template From Real Designs
- What Fields Belong on a Printable Ticket
- Binding Variables in the Visual Editor
- Uploading an Attendee CSV and Running a Batch Job
- Generating Tickets Individually Through the API
- Validation, Error Handling, and Quota Safety
- Distribution With Share Links, Expiry, and Revoke
Choosing an Event Ticket Template From Real Designs
A gate workflow should determine the starting template, not the artwork. A front-of-house concert stub serves a different handoff than a trade-show badge, while a raffle ticket and VIP pass have their own print and access requirements. Use the tickets category page as a gallery of real design patterns. Compare each layout against the fields your spreadsheet must supply and the tasks staff perform at entry.
The working question is practical: which fields stay fixed, which values change per attendee, and which printed elements must remain readable during a rushed handoff? A good event ticket template keeps the branding, event name, and terms stable. Attendee-specific values belong to bound variables, with the spreadsheet remaining the source of truth and the template handling layout.

Real layouts and the jobs they do
A front-of-house concert stub suits general admission, seated shows, and events where staff tear off a stub while retaining the other half. Its compact print area usually carries the event branding, one scan zone, and a human-readable fallback code.
A trade-show badge fits conferences, expos, and multi-entry events. The printed format is often taller, with room for a name line, company, and lanyard slot. Variable fields commonly include attendee name, ticket type, date, and a QR code.
Practical rule: if the badge hangs on a lanyard, readable text deserves nearly as much attention as the scan code.
A raffle ticket supports fundraising, school events, and drawer-style prize systems. The layout generally needs a duplicate number, tear line, and compact placement that keeps the ticket number clear after separation.
A VIP pass suits backstage access, speaker lounges, and premium entry lanes. Its visual treatment can signal status, but the data contract still needs attendee name, seat or access level, date, ticket number, and QR code.
The right choice depends on field placement and the physical handoff. A sample may look attractive yet fail once variable text grows, a code is scanned at an angle, or staff need the ticket number for manual lookup. Treat every unique QR value as one CSV column rather than a manual edit. After selecting a layout, open it in the editor, inspect the placeholder types, and confirm that the canvas matches the intended stock. For badge-style formats, the event badges template page offers the closest comparison for a ticket that also functions as an access credential.
What Fields Belong on a Printable Ticket
A printable ticket should separate fixed fields from variable fields before anyone uploads data. Fixed fields are the parts every attendee sees the same way, like the event name, venue, date, organizer logo, brand colors, and terms. Variable fields change per row in the spreadsheet, and that is where mistakes usually begin.
The most reliable templates keep the fixed layer calm and obvious. That means the event title stays visible at a glance, the venue text doesn’t get buried under decoration, and the print-safe area leaves room for the QR or barcode without crowding it.
Fixed fields versus variable fields
| Field | Type | Source | Render rule |
|---|---|---|---|
| Event name | Fixed | Template design | Keep prominent and readable |
| Venue and address | Fixed | Template design | Place where staff can scan or inspect quickly |
| Date and time | Fixed | Template design | Keep near the title or entry details |
| Brand logo | Fixed | Template design | Use a stable print-safe asset |
| Terms and conditions | Fixed | Template design | Keep legible, not decorative |
| Attendee name | Variable | CSV row | Bind as text, preserve spelling exactly |
| Ticket type | Variable | CSV row | Render clearly as GA, VIP, or similar |
| Seat row and seat number | Variable | CSV row | Keep in a dedicated seating zone |
| Ticket number | Variable | CSV row | Make it visible for manual fallback |
| QR code | Variable | CSV row or payload | Render with enough whitespace for scanning |
The QR area deserves special care. Contemporary ticketing moved toward scan-first validation because QR codes support fast entry, and industry coverage in the mid-2020s reported that 58% of venues used QR codes for entry and 86% of buyers preferred mobile delivery through apps or QR as reported in event-ticket coverage. That means the code can’t be treated as decoration. It has to stay scannable on a phone screen and on a printed stub.
A practical ticket design guide recommends a QR code size of at least 0.75 by 0.75 inches with a quiet zone of at least 0.125 inches so scanners can read it reliably at the entrance according to the layout guide. That aligns with the operational reality of crowded doors, where staff need a fast fallback if a ticket is crumpled, glossy, or held under glare.
The strongest habit is to decide which fields belong on the retained half of the ticket and which ones belong on the stub. The stub still needs a readable code and a unique number after tear-off, because gate staff and ushers often use that strip after the attendee walks in. The layout should protect those fields first, then let branding fill whatever remains.
Binding Variables in the Visual Editor
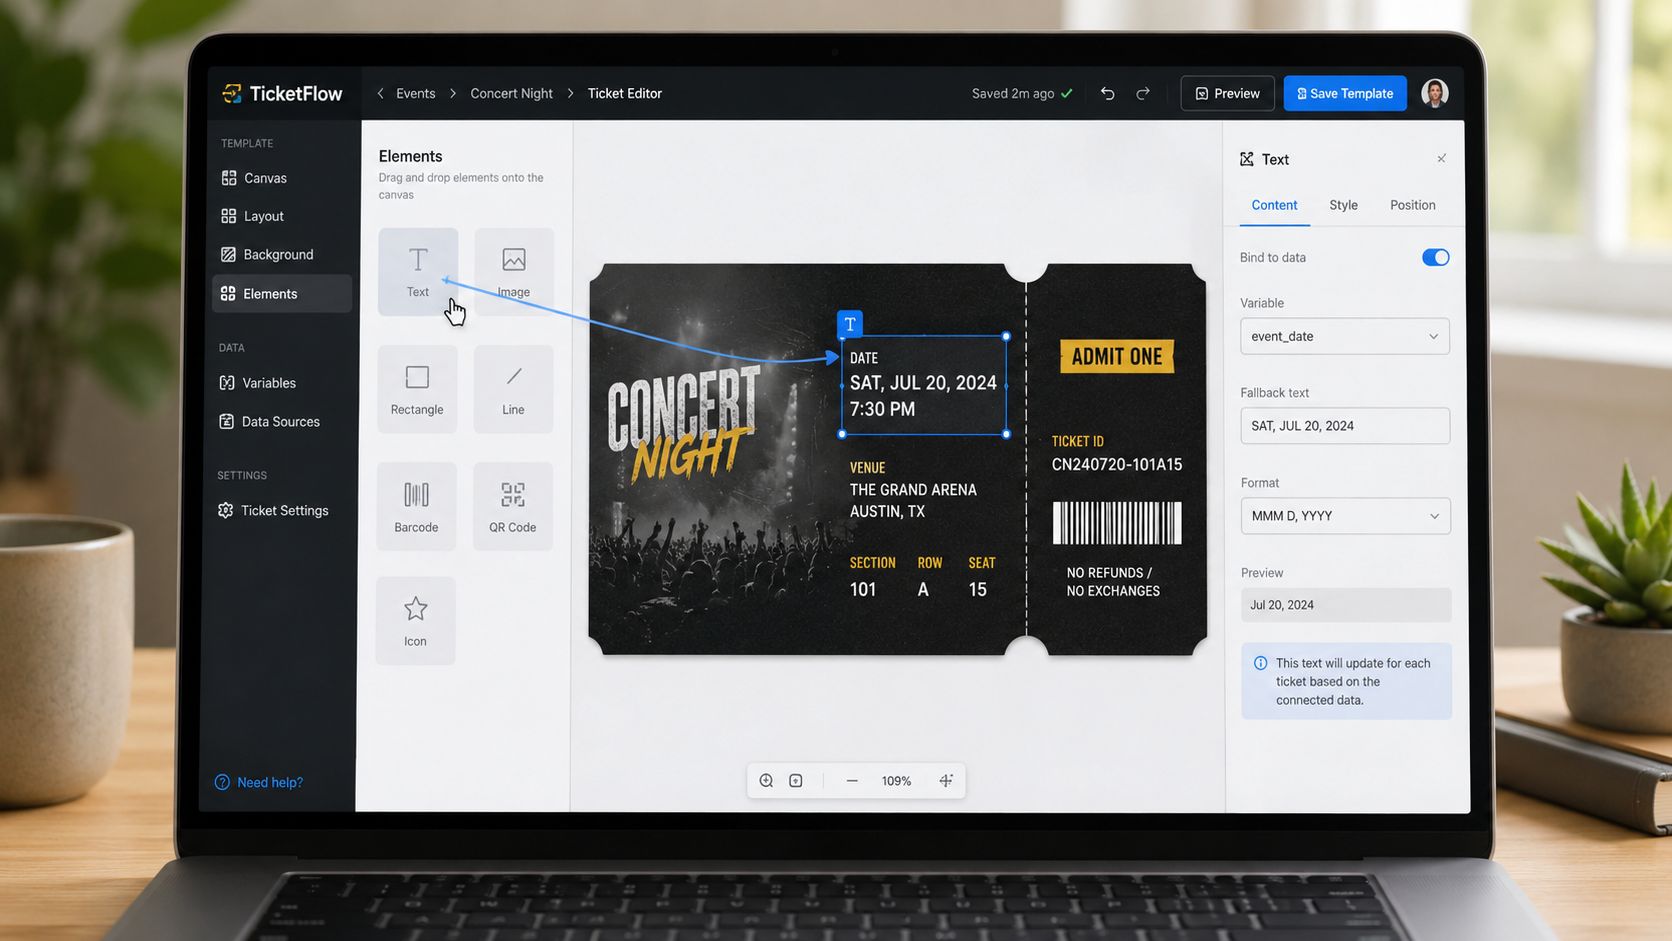
A ticket template only works at batch scale when its fields have stable names. In the visual editor, start with static sample text, then convert each editable element into a variable binding. Text, image, and barcode elements use different value types, so configure each binding according to the element rather than treating every field as plain text.
The spreadsheet remains the source of truth. If the editor expects
attendee_name and the CSV sends name, the renderer will not infer the
relationship. Store the template ID, binding slugs, and CSV schema together,
then change them through a controlled update rather than renaming columns after
production data has been prepared.
The binding flow that actually holds up
Open the template, drag a Text element onto the canvas, and replace its
sample value with {{attendee_name}}. For a name badge or seated ticket, this
usually controls the most prominent line. Keep the variable name readable
because operators will need to match it to a CSV header later.
Image bindings take a URL, and the render service fetches that asset when the job runs. A slow or unreliable host can delay a row or produce a missing image, so cache the asset or host it where the renderer can reach it consistently.
Barcode and QR bindings require a payload string and an encoding type such as QR, Code128, or PDF417. The payload should come from the row, not from a manually edited design. Error correction also affects the layout: a code placed over a busy background or printed on glossy stock needs more tolerance than one on a plain, uncluttered card.
Treat the binding as the variable contract that makes the design repeatable, distinct from the design itself. Each unique QR value can occupy one CSV column, while the template controls its position, size, and visual treatment.
Gate-control systems have long paired readable ticket numbers with QR codes and barcodes, allowing staff to scan or type the same code at entry in documented gate-control workflows. The template supplies the layout, while the ticket code connects each spreadsheet row to its validation record.
The API follows the same contract. Upload variable names must match the bindings exactly, and the template ID should travel with the schema so later edits do not break existing jobs. The API template reference provides a useful comparison for how a visual design maps to rendered output.
Uploading an Attendee CSV and Running a Batch Job
A spreadsheet error can affect an entire ticket run. Treat the CSV as the source of truth and the template as a layout that is already bound to its fields. Export the template schema, fill one attendee per row, then submit the file so each row produces one rendered ticket. Numbered tickets and unique QR values stay in their own columns instead of requiring manual edits.
This workflow fits seated events, conferences, and registration systems that already hold attendee data. One row becomes one ticket record, while the batch job converts those records into print-ready PDFs.
The batch flow from upload to ZIP
Fill the exported CSV with the bound fields, such as attendee_name,
ticket_type, seat_row, seat_number, and qr_payload. Upload it through
the batch endpoint. Before rendering begins, the system compares the CSV headers
with the template schema.
A mapping modal provides an early check. It matches each header to the template variable, so a spelling error is caught before rows enter the render queue. If the headers match, run a dry pass first. The result gives the operator a render count to review before committing the batch.
After the job is queued, the render service processes rows in chunks. It returns a job object containing a batch identifier and a status URL. Successful files are collected in a ZIP, while a manifest CSV records the filename and render status. The print operator can then isolate failed rows without opening every PDF.
| attendee_name | ticket_type | seat_row | seat_number | qr_payload | render_status |
|---|---|---|---|---|---|
| Maya Chen | Keynote | A | 14 | ticket_001 | rendered |
| Jordan Lee | Keynote | A | 15 | ticket_002 | rendered |
| Priya Shah | Keynote | B | 01 | ticket_003 | rendered |
| Sam Ortiz | Keynote | B | 02 | missing_payload | failed |
A failed row usually points to a missing value or an invalid format. The error should be treated as a data correction, not a design failure. Fix the row, validate it against the schema, and rerun the affected work rather than changing a template that rendered correctly for the other records.
The batch model matches spreadsheet-first bulk QR workflows, where each CSV row becomes one QR code or ticket record and the output is downloaded as a ZIP for printing as described in the batch generator guide. The division of responsibility is clear: the spreadsheet stores the records, the template renders them, and the ZIP contains the print set.
Generating Tickets Individually Through the API
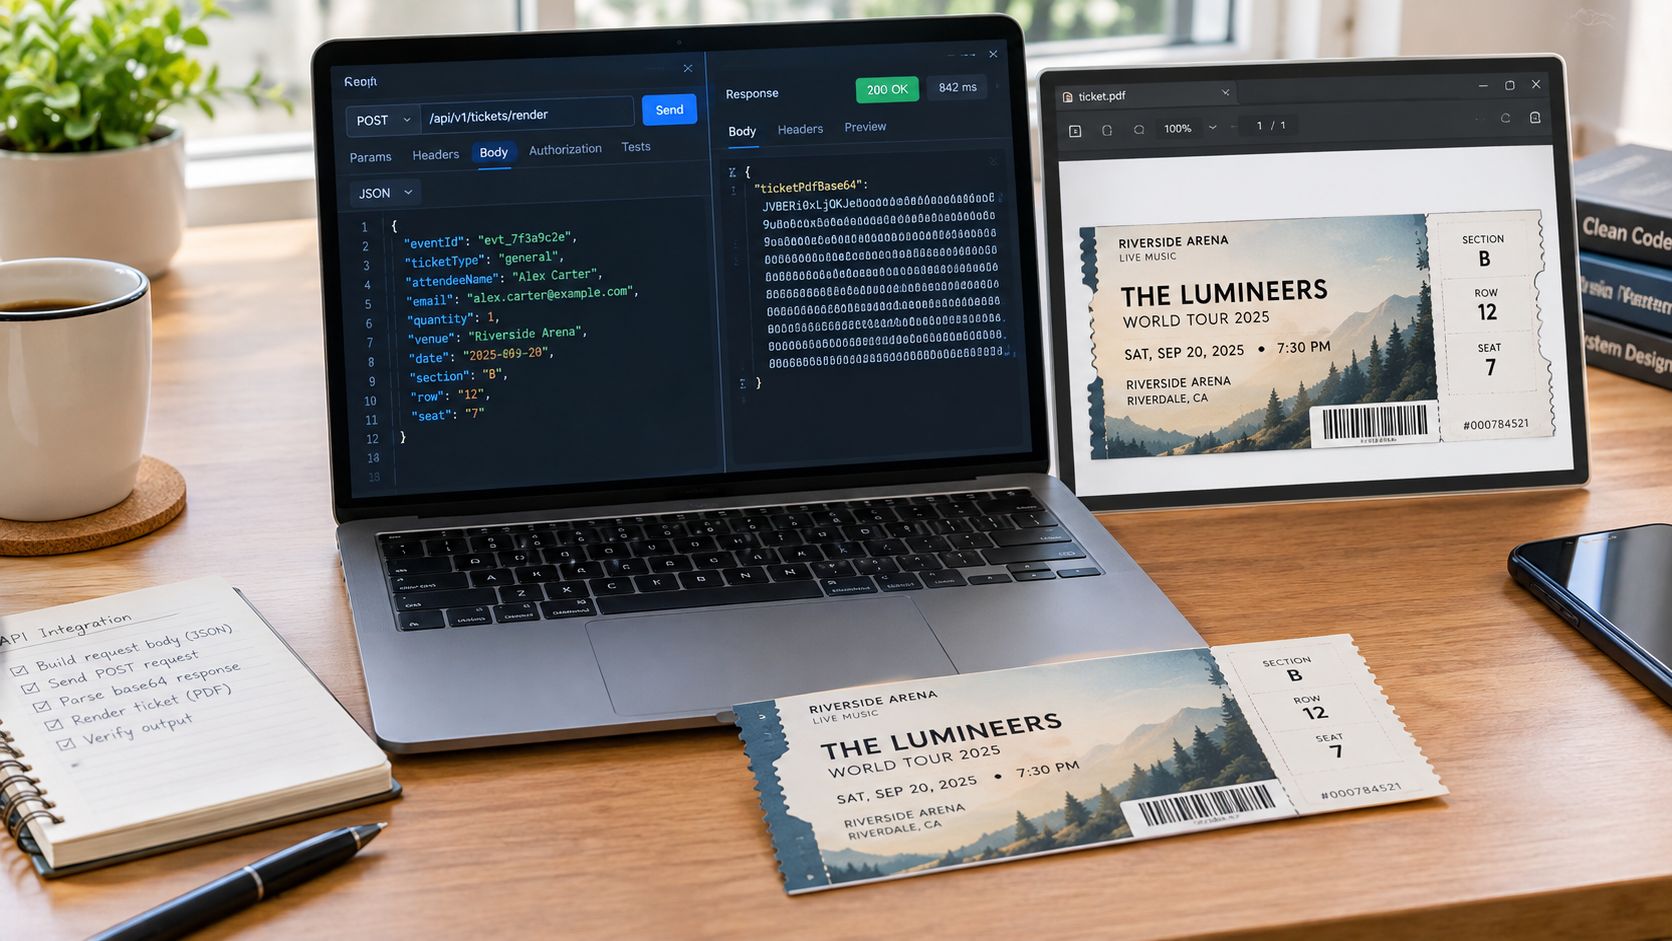
Single renders are the right move when the ticket has to be generated on demand, like a late VIP walk-up, a corrected name, or a door sale that needs a fresh PDF without rerunning the full batch. The request body sends one value per bound variable, and the response comes back in one of two patterns, depending on whether the caller wants the file immediately or wants to pick it up later.
For a door-side workflow, single render calls are easier to debug because each ticket is isolated. They’re also cleaner when an operator is printing from a tablet and needs one result right away instead of a ZIP file full of unrelated rows.
Request shape and delivery behavior
A basic single-render call uses the template ID and a JSON body with the variable values. When the request is set for inline delivery, the response returns the PDF as base64 plus a render ID. When it’s set for async delivery, the render ID comes back first and a webhook or callback can notify the caller when the file is ready.
The delivery-link option changes the output from binary content to a signed URL, which is better when another system needs to hand off the file later. That link should expire on a defined schedule, and it can be revoked if the ticket needs to be invalidated before it gets used.
A request with strong safeguards also includes an idempotency key so a retry does not create a duplicate render. That matters on flaky mobile networks, where the same door operator might tap submit twice while waiting for a response.
Operational rule: use single renders for the long tail, not the main batch. They’re simpler to trace, but they’re the wrong shape for a hundred-seat manifest.
The practical trade-off is straightforward. Single renders are the cleanest way to handle exceptions, but batches are the better fit when the attendee list is already stable and the only real variable is the spreadsheet. For API-driven teams, the ticket template rendering endpoint is the deeper reference for numbering logic and one-off generation patterns.
Validation, Error Handling, and Quota Safety
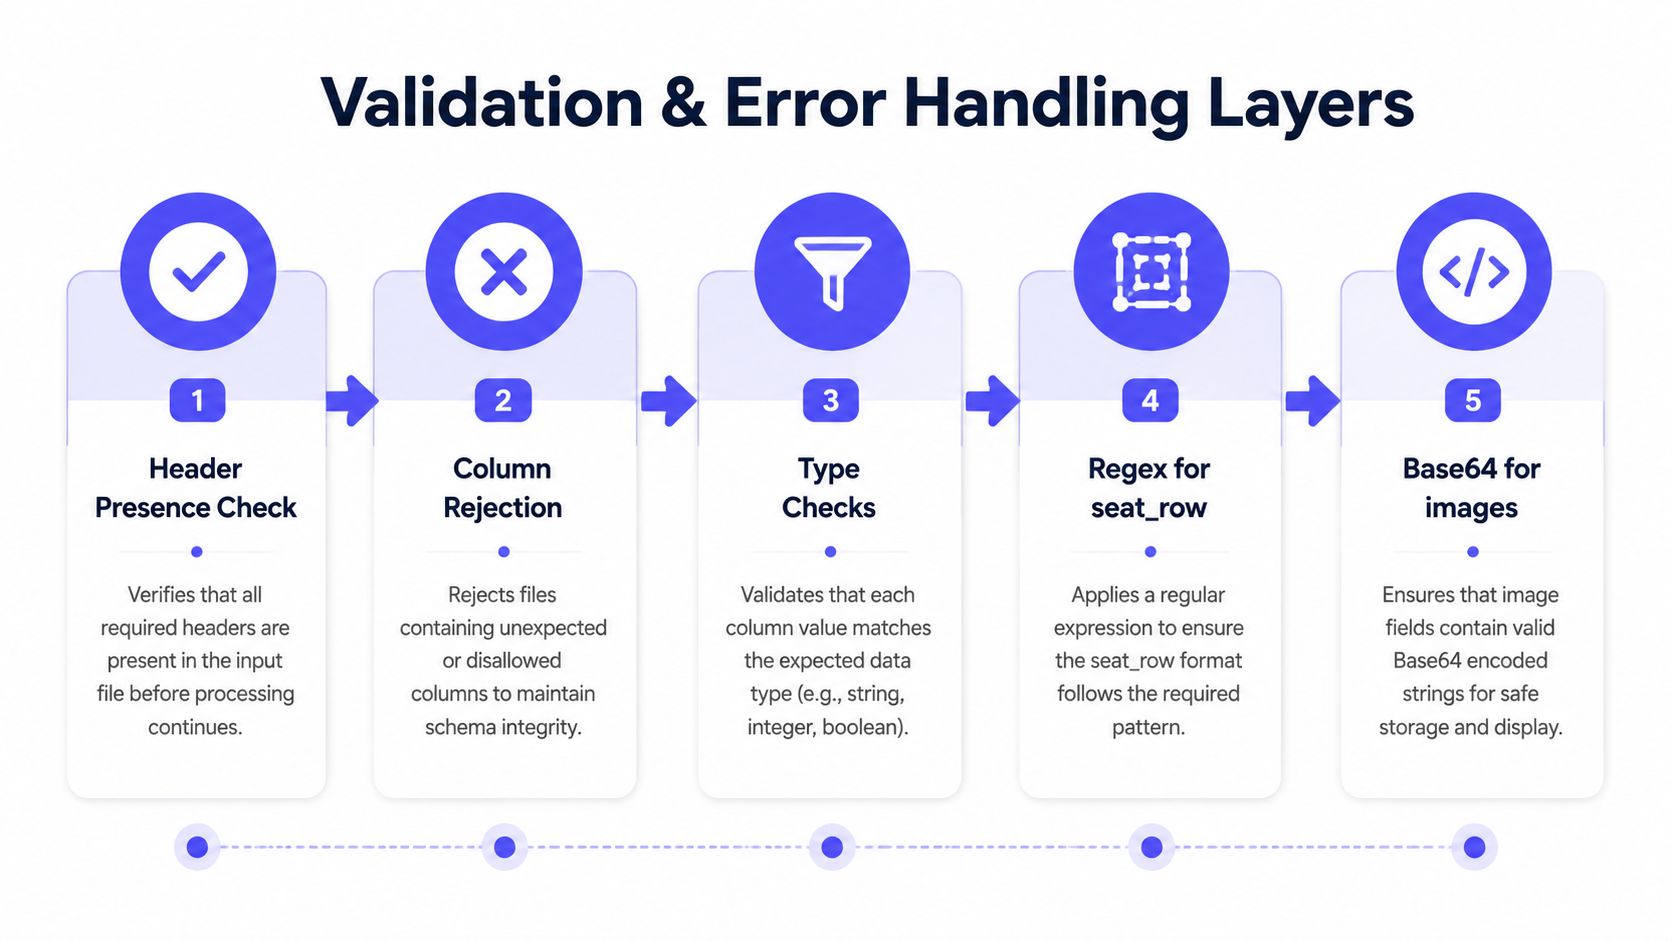
The right validation stack starts before rendering and keeps working after the job is queued. Header checks catch missing columns up front, unknown-column rejection blocks stray input, and type validation makes sure each variable looks like the template expects. That is how a batch avoids wasting render capacity on rows that were never valid.
This is also where the ticketing stack needs to be more honest than the design preview. A ticket can look perfect and still fail because a font is missing, a field is placed out of bounds, or a QR payload is malformed. The preview is only one layer of confidence, not proof that the row will render.
The failure layers that matter
The first failure class is schema mismatch. If the CSV headers do not match the bound variables, the upload should stop before any render is charged. The next layer is variable typing, where string length, seat-row format, image encoding, and payload shape all get checked against the schema.
After that comes render preflight. The engine catches issues like missing fonts or coordinates that fall outside the canvas. If a batch starts failing repeatedly at this stage, a circuit breaker should pause the job instead of hammering the renderer with the same broken input.
Partial failures need a clean trail. A failed rows file with row numbers and reasons is more useful than a vague job error, because the successful rows can still ship while the broken ones get fixed and rerun. That keeps a venue from losing a whole ticket run because of one malformed record.
Failed renders shouldn’t cost a clean batch its momentum. The job needs to surface the bad rows, not bury them.
The main CSV mistakes are predictable. One is a renamed header that no longer matches the binding slug. Another is a seat field that contains free-form text instead of a stable row value. A third is an image column that carries plain text instead of encoded image data or a valid fetchable asset. The fourth is a QR payload that was edited by hand and no longer matches the row’s unique record.
The safer habit is to validate the CSV before submission, keep the schema fixed, and let the failed rows file do the debugging. That’s much cheaper than reprinting a whole batch because one column drifted overnight.
Distribution With Share Links, Expiry, and Revoke
Once a ticket becomes a URL, distribution becomes an access-control problem as well as a delivery task. That affects email, wallet handoff, and any workflow where staff or attendees must reopen a ticket without regenerating it. The spreadsheet remains the source of truth. Each generated file and share link should trace back to one attendee row and its unique QR value.
The first choice is link scope. An order-level link suits one purchaser holding multiple admissions. An attendee-level link gives each person a separate ticket, which makes independent gate validation and revocation easier to manage.
Links, expiry, and revoke behavior
A share link commonly uses a tokenized path tied to the ticket ID. The delivery
mode changes the response: delivery: link returns a URL, while delivery: email prepares the ticket for a messaging workflow. Short alias paths also
reduce wrapping and truncation in mobile email clients that handle long URLs
poorly.
Set expiry explicitly. An absolute timestamp gives staff a fixed cutoff, while a TTL window defines how long the link remains usable after creation. Keep that policy separate from the QR payload. The QR validates at the gate; the delivery link provides file access.
Revoke provides containment when a venue changes, a ticket is duplicated, or the distribution list is incorrect. A soft revoke marks the token invalid, allowing the scanner or delivery endpoint to return a 410-style response. A hard purge removes the record more aggressively, so it should be reserved for cases where retention is no longer required.
On event night, use a short operational checklist. Pre-warm scanner caches, confirm that backup PDFs follow the same QR specification, and resolve-test every alias before doors open. These checks connect clean attendee data with reliable crowd entry.
The final handoff should be reversible. Send links only after the batch has passed validation, record which attendee received each token, and keep revoke access with the operations team rather than burying it in the design editor.
If the next ticket run needs to work the first time, build it from the spreadsheet backward. Bind the variables, validate the CSV before upload, print one sample, and then send the full batch. For a production event ticket template, that order saves more time than a design tweak.