Showing Posts From
Certificates
- 07 Aug, 2026
How to Generate Certificates From a Spreadsheet (CSV to ZIP, No Mail Merge)
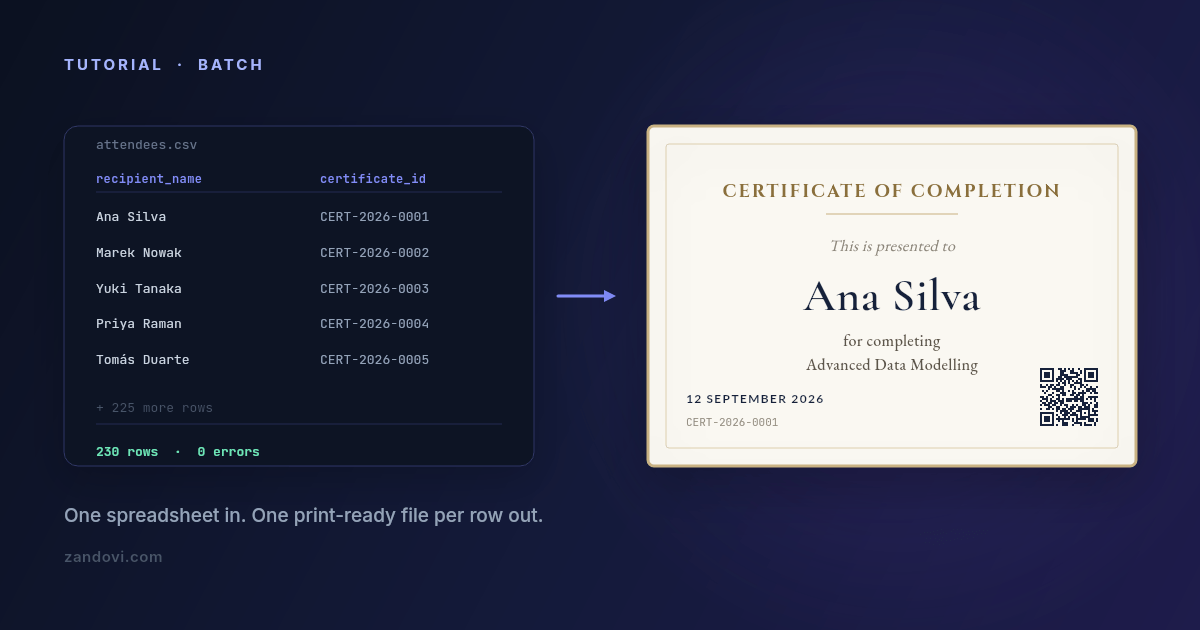
The course finished on Friday. Two hundred and thirty people attended. Each of them needs a certificate with their own name spelled correctly, the course title, the completion date, and something that makes it look like it came from an organization rather than from a word processor at 11pm. You have all of that in a spreadsheet already. The gap is turning 230 rows into 230 files. Why the usual routes hurt Mail merge. Word and Google Docs will merge names into a document, and for plain text on white paper that's fine. Certificates aren't plain text. They're a layout, with a border, a logo, a signature block, and typography that has to sit exactly where you put it. Merging into a designed document tends to nudge things by a few pixels per record, and you find out at print time. Duplicating slides. The 230-slides-in-a-deck approach. It works, and it costs an entire afternoon, and any change to the design means doing it again. Design-tool bulk features. Better, and genuinely the right tool for some jobs. The limits show up as row caps, no automation hook, and export formats that aren't print-ready. A script. If you're comfortable with code, generating certificates from a CSV in Python is a solid afternoon's work. Then you own the layout code, the font loading, and the PDF generation forever. What follows is the fourth route: design the certificate once in an editor, mark the parts that change, upload the spreadsheet, download a ZIP. Step 1: design the certificate Start from a certificate template or a blank canvas. If these will be printed, set the canvas up for print from the start: pick an A-series or US Letter preset in landscape, and set the export DPI to 300. Doing this first matters. A canvas sized for the screen and scaled up afterwards is how you end up with a soft logo on a printed certificate.Lay out the fixed parts: border, organization logo, the words "Certificate of Completion", the signature line. These never change, so they're just design. Step 2: mark what changes as variables This is the step that turns a design into a generator. Select each element that differs per person, mark it as a variable, and give it a name:Variable Element Notesrecipient_name text Set auto-fit so "Bartholomew Featherstonehaugh" and "Li Wei" both look intentional.course_title text Usually identical across the batch. Give it a default value and you can leave the column out.completion_date text Dates travel through as text, so format them in the spreadsheet exactly as they should print.certificate_id text Mark it required so a blank cell is caught rather than rendering an empty line.verify_qr QR code Encodes a verification URL. See below.Give every variable a description too. It shows up as guidance later, and if someone else ever fills the spreadsheet, that one sentence prevents most of the back-and-forth. Where a column should only ever hold a handful of known values, set its Allowed values list. Type in the real values and anything else in that column is rejected before rendering, which is the cheapest way to stop a typo becoming 230 wrong certificates. A note on the QR code. Binding a QR element to a variable lets each certificate carry its own verification link, https://yoursite.com/verify/{certificate_id}, which is how you make a certificate checkable rather than merely decorative. Keep the QR element at least 100×100 px and use the Print Safe button to get the quiet zone right; QR codes printed too small or too close to a border are the number one reason scans fail on paper.Step 3: get the CSV with the right headers Click Generate, then the Batch tab, then Download CSV Template. This gives you a CSV whose header row already matches your variable names exactly. Use it. The most common failure in bulk generation is a column called Name when the template expects recipient_name, and starting from the generated file removes that entire category of problem. Open it in Excel, Google Sheets or Numbers, and paste your data underneath. One row per certificate: recipient_name,course_title,completion_date,certificate_id,verify_qr Ana Silva,Advanced Data Modelling,12 Sep 2026,CERT-2026-0001,https://example.com/verify/CERT-2026-0001 Marek Nowak,Advanced Data Modelling,12 Sep 2026,CERT-2026-0002,https://example.com/verify/CERT-2026-0002 Yuki Tanaka,Advanced Data Modelling,12 Sep 2026,CERT-2026-0003,https://example.com/verify/CERT-2026-0003If you're building the ID and verification URL from a spreadsheet formula, double-check the first and last rows after filling down. Off-by-one errors in a fill-down are invisible until someone scans a code and lands on the wrong person's record. Step 4: upload and let validation do its job Drag the completed CSV into the upload area. Three things happen before anything renders. Your column headers are matched against the variable names, so a missing required column is flagged immediately and any column the template doesn't recognise is called out as ignored. Then every row is checked: a missing required value, a value outside a variable's allowed list, or QR data too long to encode all get reported with the row and column named. Finally, any column whose values run much longer than the default you designed around is flagged as a fit risk, so you find out that one name is three times the length of the rest before it shrinks to unreadable. You get a summary like "3 errors in 230 rows" with a table naming each one. Fix them in the spreadsheet, re-upload, re-validate. This step is the whole reason to prefer a validated batch over a script you wrote on Thursday. Catching three bad rows before rendering costs you two minutes. Catching them after you've printed and mailed 230 certificates costs considerably more.Step 5: choose your output, then submit Pick the format and resolution. Use PDF at 300 DPI for anything going to a printer or a print shop, and PNG at 2× scale for anything going into an email or a download link. Then Submit Batch. The job appears in the list below with a status of PENDING, PROCESSING, COMPLETED or FAILED, along with the row count and how long ago you submitted it. When it's done, Download Results gives you a ZIP with one file per row. If a job comes back FAILED, expanding it in the list tells you which rows failed and why. Renders that fail are refunded to your quota, and a batch rejected at validation is never charged at all, so a failed job doesn't cost you anything except the time to fix and resubmit. The row limits, stated plainly Batch jobs have a per-job row cap that depends on your plan:Plan Rows per jobFree 25Personal 100Studio 200Team 300Business 400So a 230-person course is one job on Team, two on Studio, three on Personal. The practical workaround for a larger cohort is to split the spreadsheet by cohort, session or date, which is usually how you want the files organized anyway. Sort the sheet first, then split; that way each ZIP maps to something meaningful rather than to an arbitrary row range. Every rendered row counts as one render against your monthly pool, the same as an API call. 230 certificates is 230 renders. On the $29 Personal plan that's 5,000 renders a month, so the certificates for a busy training calendar fit comfortably; on the free plan's 100 renders, a single mid-sized cohort will use most of it. There's also a maximum output resolution that varies by plan. The free plan tops out around A5 at 300 DPI, paid plans go to A4/US Letter and above. If you're producing large-format certificates, check that before designing the canvas rather than after. Making the files easy to hand out Two things worth deciding before you generate rather than after. The first is file naming. Files in the ZIP are named from your data, so having a certificate_id column pays for itself here. A ZIP of CERT-2026-0001.pdf files is trivially matchable against your attendee list. A ZIP of certificate-1.pdf files is not. The second is delivery. If you're emailing these individually, keep the same CSV as the source of truth: it already has the name, the ID, and, if you add a column, the email address. The ZIP and the sheet then line up row for row, and whatever you use to send the mail can join them without a manual matching step. When to move from the spreadsheet to the API The batch flow is a browser workflow: a person uploads a file and downloads a ZIP. That's the right shape when certificates are an event. A cohort finishes, you generate a set. It's the wrong shape when certificates are a continuous stream. If your platform issues one the moment a learner finishes a course, at unpredictable times, you want the same template called from your backend instead: one POST per completion, PDF bytes back, attached to an email or stored against the learner record. Same template, same variables, no spreadsheet. Most teams end up using both. The API covers the automated path, and the batch tab covers the "we ran a workshop and need 40 certificates by Thursday" path that never quite fits the automated one.The batch generation guide covers the dialog in detail, and the free plan gives you 100 renders a month so you can try a real cohort without a card.